
How to Set Up Google Digital Signage Software

Ever wondered how to set up Google digital signage software without turning it into a complicated IT project? It is simpler than most businesses expect, especially when using familiar tools like Chromecast with Google TV, Chrome Sign Builder, or a dedicated Google TV CMS such as AIScreen. A typical setup starts with a Chromecast display setup connected to a compatible TV, followed by installing a digital signage player app. From there, content creation, scheduling, and real-time signage update are managed through a centralized dashboard, giving teams full control without manual screen updates. According to Grand View Research, over 63% of businesses report that Google Assistant–enabled digital signage players help reduce manual labor and improve operational efficiency, which explains the growing adoption of Google signage software across retail, offices, and public spaces.
This blog post explains the complete setup process, from choosing the right display and installing the software to connecting accounts, customizing templates, and sending messages live to screens. Whether you’re managing a single TV or a multi-screen network, this step-by-step guide helps you launch quickly while showing how AIScreen simplifies integration with Google TV and Android TV devices.
What Is Google Digital Signage Software?
Google digital signage software is a cloud-powered platform that enables users to display and manage content across digital screens using Google-compatible services, making cloud-based display management a key strength of this solution.
It allows centralized control of screens while supporting flexible content scheduling across single or multiple displays.
It supports dynamic signage that can include videos, menus, promotions, calendars, and internal updates. According to Statista, 62% of businesses that switched to Google Assistant digital signage saw improved brand recognition, while 44% reported an increase in customer engagement.
The software integrates with tools like Google Drive, Google Slides, and Chrome extensions, making it ideal for schools, retail, restaurants, and corporate environments.
Businesses can also pair it with Chromecast, Android TV, Google TV, or a capable Google Assistant digital signage player, or use a third-party signage CMS for Chromecast such as AIScreen.
When considering implementation, the key benefits include seamless compatibility with Google Assistant and Google apps, enabling voice control and easy integration.
Remote content management is possible through a browser or admin console, allowing real-time updates through cloud-based display management from anywhere.
Users also benefit from simple display control, whether for personal setups or large-scale enterprise signage. The platform remains affordable and scalable, supporting multiple devices and advanced content scheduling without high upfront costs.
Why Use Google Digital Signage Software?
Ever feel like digital signage sounds powerful, but too expensive to justify? Why Use Google Digital Signage Software comes down to accessibility, flexibility, and smart cost savings. Traditional signage setups often require proprietary players and costly commercial displays.
But with Chromecast and Google TV, you can cut the cost without cutting corners. Most people don’t realize that a simple $40 device can power a signage solution across multiple locations, making it an affordable signage solution for businesses that want impact without heavy investment.
One of the biggest advantages is ease of use. Google digital signage software offers cloud-based content management that lets teams upload, schedule, and update content from anywhere. Whether you’re running one screen or dozens, remote digital screen updates ensure your messaging stays fresh without on-site intervention.
Flexibility is another key reason businesses adopt this approach. Google signage works seamlessly across retail stores, restaurants, offices, schools, and healthcare spaces. This adaptability makes it a strong option for scalable signage for SMBs, allowing small teams to start simple and expand as their needs grow.
Most importantly, the ability to display dynamic content in real time, menus, promotions, announcements, or dashboards, gives businesses a modern, future-ready signage solution.
With minimal hardware costs and cloud-driven control, Google digital signage software removes traditional barriers and makes professional digital signage achievable at any scale.
How to Set Up Google Digital Signage Software
Setting up with Google Digital Signage software is easy when you follow a structured process throughout the course. You’ll need a compatible display, signage software, wifi access, and a Google account.
According to Nielsen research, digital signage player captures 400% more views than static signage, making it one of the most effective in-store communication tools. This guide uses AIScreen to boot up your digital signage as a reference because of its simple setup and native integration with Google.
Let’s enter and walk through each step of the setup process in detail.
Step 1: Choose a Compatible Google TV for Your Setup
Ever noticed how the right screen choice can make Google signage feel effortless, or painfully limited? Choose a Compatible Google TV for Your Setup is the foundation of a smooth Google Digital Signage software deployment.
The display you select directly affects visual quality, playback performance, and how easily your system supports remote updates.
A Google-powered digital signage player requires screens that support HDMI, offer reliable Wi-Fi, or run on Android TV or Google TV platforms, similar to what you’d expect when evaluating the 7 best Samsung smart signage TVs for digital displays.
For the best experience, choose a screen with at least 1080p resolution, solid brightness levels (300–500 nits for indoor, 1000+ nits for outdoor), and durable hardware built for extended operation. These specs ensure consistent playback in business environments that demand reliability.
To ensure full compatibility, your display should work seamlessly with a third-party CMS like AIScreen. These platforms place minimal processing load on the TV itself but depend on stable network access, smooth media decoding, and Chrome extension support.
Here are two tested and recommended options for business users:
Insignia 4K UHD Smart Fire TV
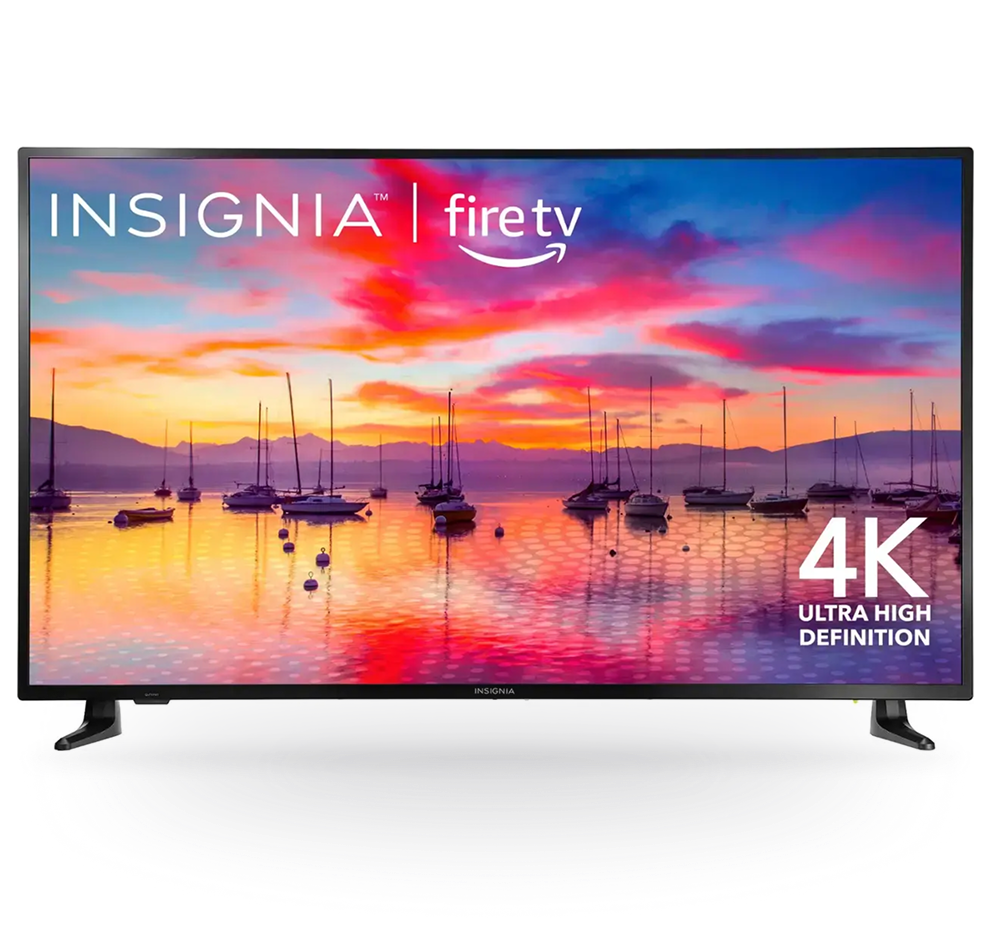
- Resolution: 4K UHD (2160p)
- Smart Features: Built-in Fire TV & Alexa Voice Remote
- Connectivity: HDMI, USB, Wi-Fi, AirPlay
- Ideal Use: Office lobbies, reception areas, or conference rooms (12+ hrs/day)
- Price: $299–$429
- Benefit: Combines stunning visuals with seamless app integration for reliable digital signage playback
Toshiba Class C350 Series Fire TV
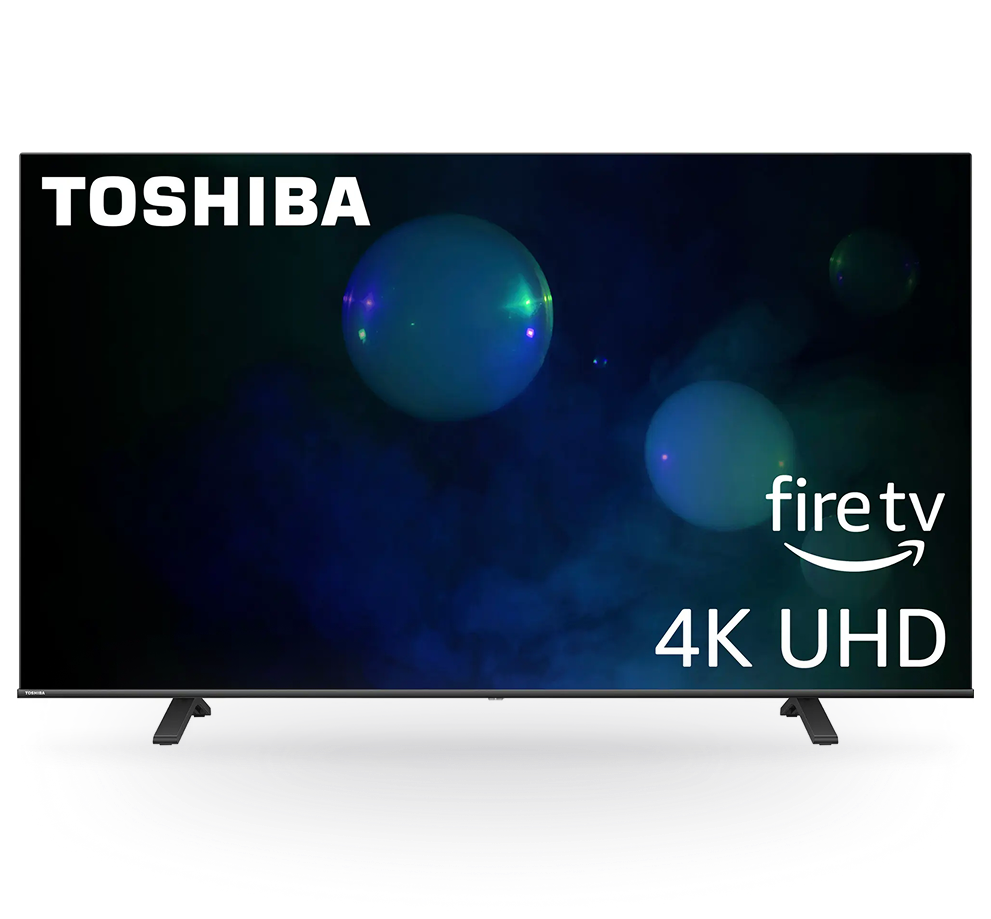
- Resolution: 4K UHD (2160p)
- Smart Features: Fire TV built-in, Alexa-enabled remote, DTS Virtual:X audio
- Connectivity: HDMI, USB, Wi-Fi, AirPlay 2
- Ideal Use: Corporate offices, retail showrooms, or educational campuses (12+ hrs/day)
- Price: $319–$459
- Benefit: Offers vibrant picture quality and built-in signage compatibility with Fire TV OS
Step 2: Plug In Your Chromecast with Google TV
Ever feel like the smallest connection step can slow everything down? Plug In Your Chromecast with Google TV by connecting the Chromecast directly into an available HDMI port on your TV. Once plugged in, power the device using the supplied adapter and turn on the display.
Make sure your TV input is set to the correct HDMI source so the Chromecast interface appears on screen and completes the initial setup.
Most modern TVs support Chromecast with Google TV, but compatibility issues can occasionally happen. Ensure the TV firmware is up to date and that the HDMI port is functioning correctly. A stable Wi-Fi connection is also essential for the device to register and sync with your Google signage software.
If the device isn’t recognized, start with simple troubleshooting:
- Restart both the Chromecast device and the TV before reconnecting
- Try a different HDMI port if available
- Confirm the power cable is securely connected
- Check that the TV supports HDMI-CEC if required
Once connected, your Chromecast is ready to work with your digital signage CMS and receive content for real-time updates.
Step 3: Download a Supported Digital Signage Player App
Installing and setting up the digital signage software is where you lay the technical foundation for your display network. Once you download digital signage player app, it works best when paired with either cloud-based or locally installed signage players that can be managed through a content management system (CMS).
You’ll want to choose a platform like AIScreen that’s built for Google ecosystem compatibility, remote content control, and real-time updates. For best results, use a cloud-based CMS, which gives you the flexibility to control content from any browser without needing direct access to the device.
To get started, visit the official AIScreen download center and select your device type: Android, Chrome OS, Windows, or Linux. Download the correct player version based on your screen or media box (e.g., use the Android APK for Google TV).
For offline setup via USB, transfer the installer to your screen or media player and run it. For online setups, install directly through a browser or the Google Play Store on supported smart TVs. Once installed, open the software and complete the initial sign-in or create a new account.
Step 4: Create an Account on the CMS App
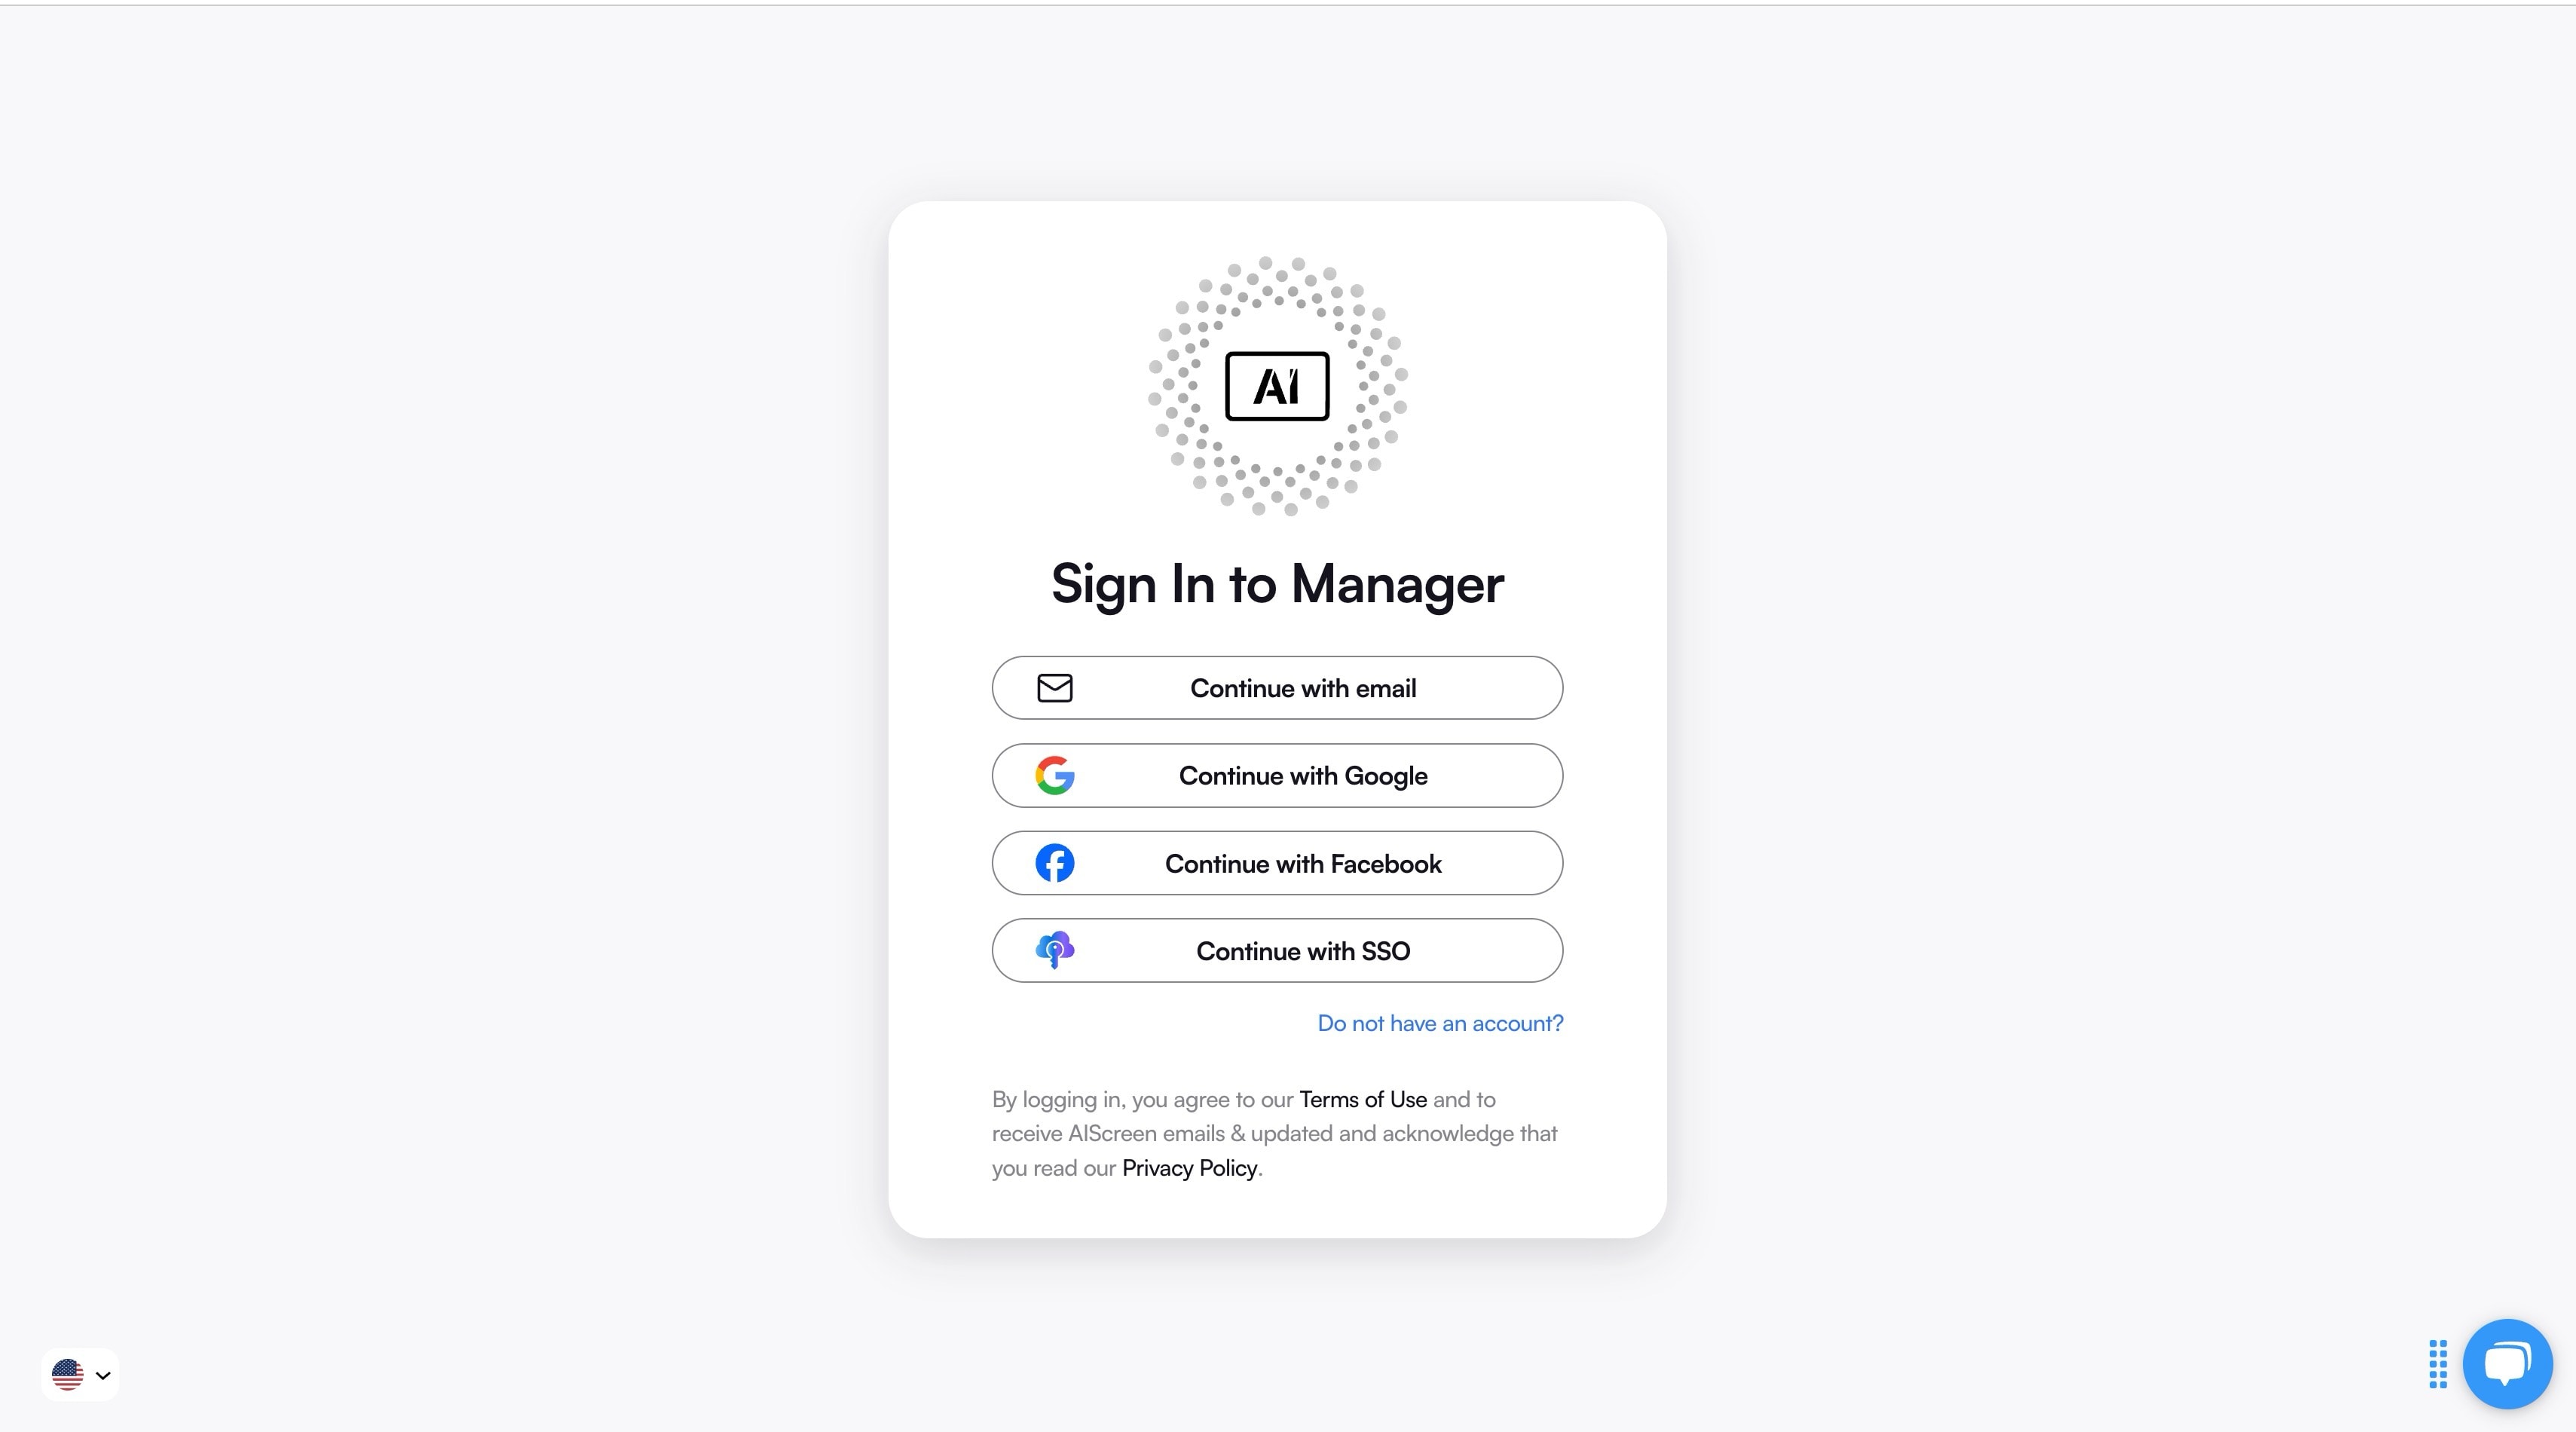
Creating an account in the digital signage app platform is necessary before you can start uploading or managing content. Most remote signage platforms like AIScreen offer a streamlined sign-up process that allows businesses to integrate their existing Google accounts, Google Drive, or Google Slides for real-time content sharing and backup.
To create your AIScreen account, visit the AIScreen dashboard in your browser and click the “Log In” button at the top right. Select “Create Account” and fill in your name, business email, and a secure password.
After submitting the form, check your inbox to verify your email via the confirmation link. Once verified, log in to the platform and turn on to connect your Google Drive to sync slides, folders, or videos directly from your cloud storage.
Once set up, you’ll have full access to the signage CMS dashboard where you can organize screens, group devices, schedule content, and even use analytics to track performance.
Step 5: Pair the Chromecast Device with Your CMS Dashboard
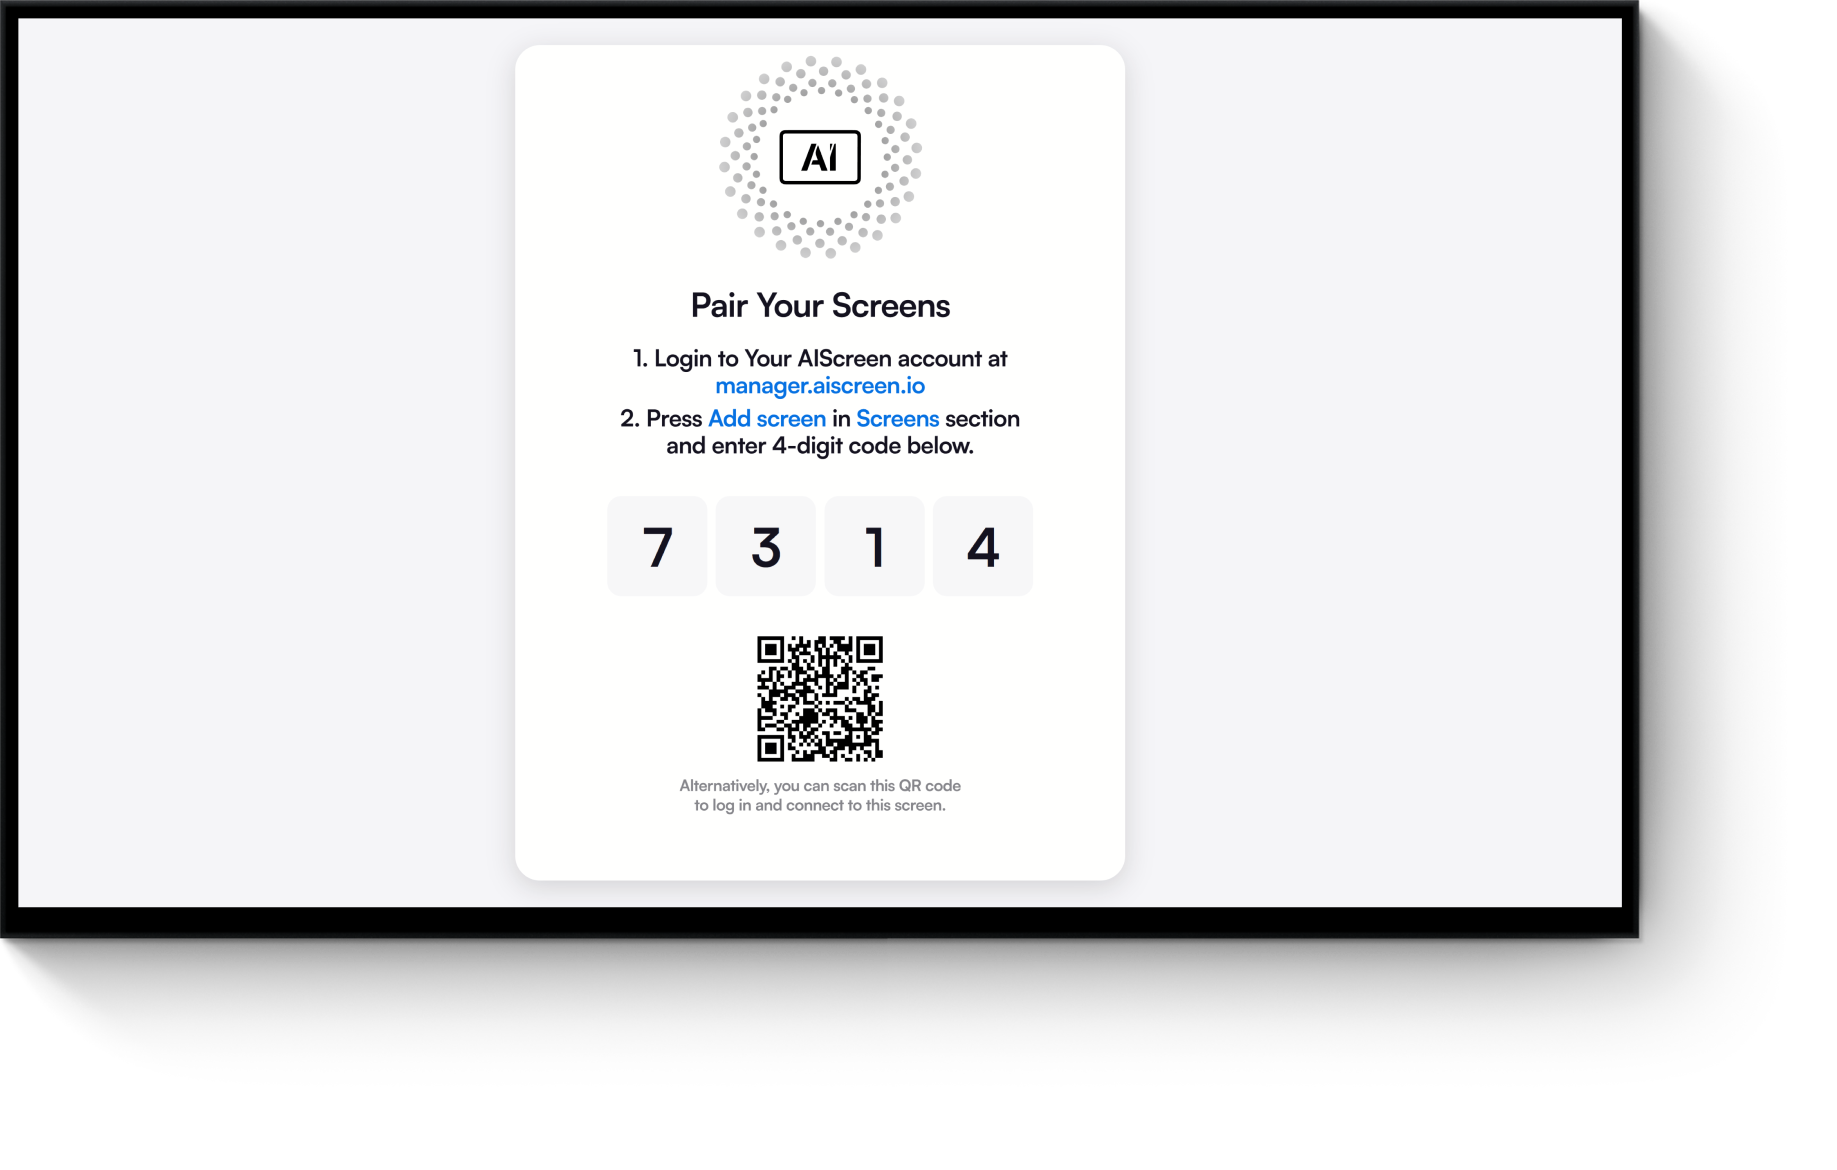
Pairing your screen or device with the digital signage software is a crucial step in activating your display and enabling remote content management. This process links the screen to your cloud CMS dashboard and allows you to control it remotely. You can use this method for smart Google TVs, Chromecast devices, digital signage players, or even Chromebooks acting as kiosks.
To pair your screen or player, open the AIScreen app on the installed device, where a unique pairing code will appear. Go to your AIScreen web dashboard, navigate to Devices > Add New Device, and enter the code. Name the device (like “Lobby Google TV” or “Cafe Menu”) and assign it to a group if needed.
Click Confirm, and the screen will show up in your device list, ready to receive content. If pairing fails, check your Wi-Fi connection, ensure the correct HDMI input is selected, restart the app for a new code, or power cycle the device if it becomes unresponsive.
Once successfully paired, your device is now connected and can be updated in real-time using your CMS.
Step 6: Upload or Customize Your Digital Signage Templates
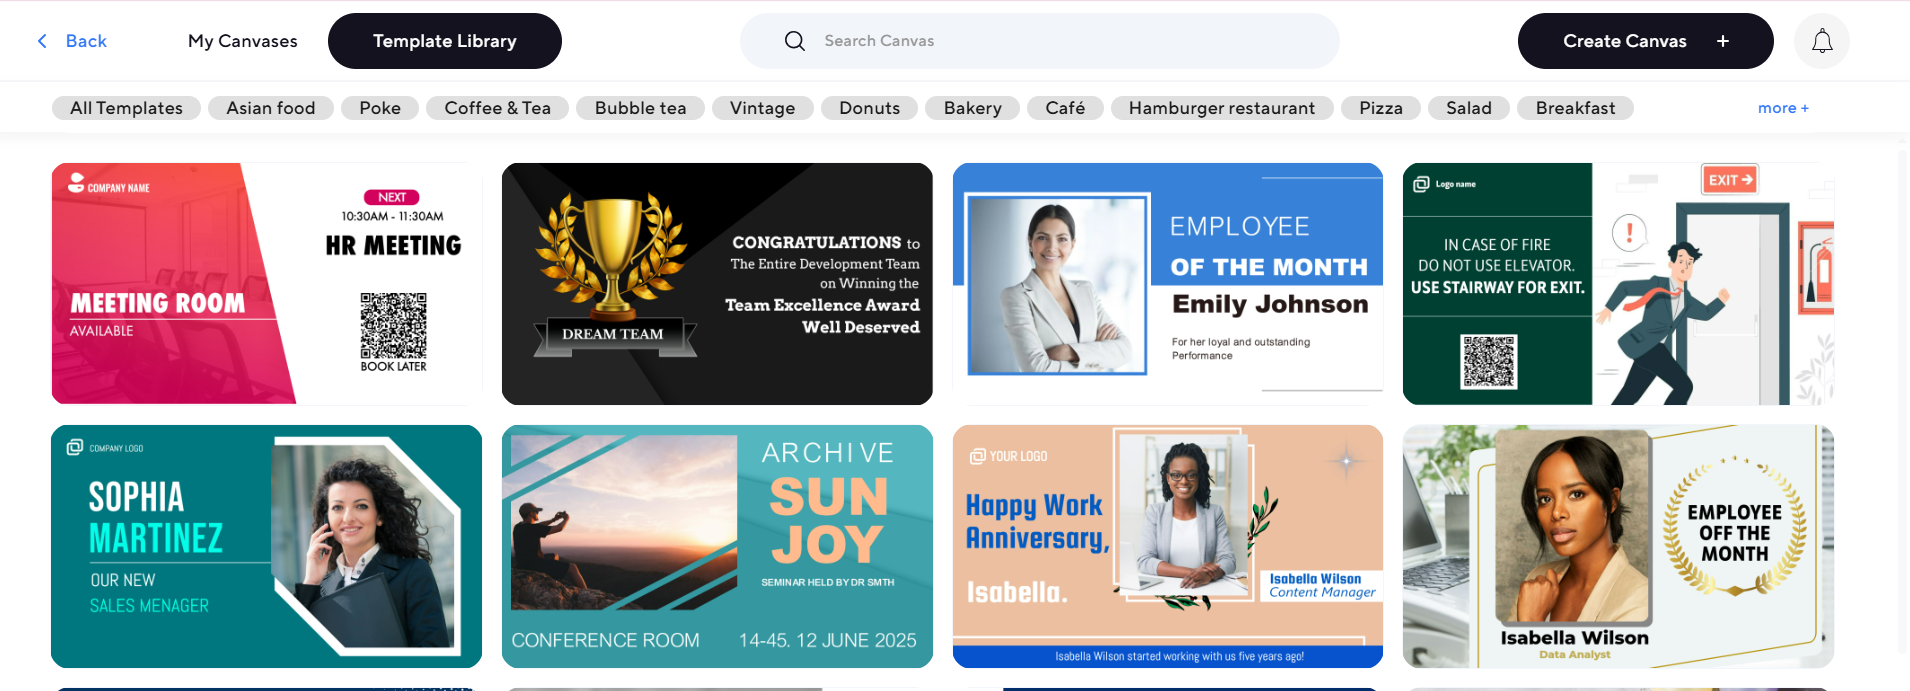
Upload or customize digital signage template to reflect your brand’s identity, capture viewer attention, and incorporate sound. Google digital display content platforms like AIScreen provide a wide range of pre-designed templates you can use immediately or customize based on your brand identity. These templates cover everything from restaurant menus and sales promotions to internal office announcements and welcome boards.
To upload or create a custom template, log in to your CMS dashboard and go to Content > Templates. You can browse ready-made categories or click Upload New Template if you’ve designed one in Canva or PowerPoint.
Use the built-in editor to customize text, fonts, background colors, logos, and visuals. Easily drag and drop media from Google Drive, upload high-resolution images, or embed videos. Once you’re done, preview the final design and assign it to one or more screens.
The system allows real-time adjustments, meaning any change made in the dashboard can be reflected on your screens in seconds.
Step 7: Set Up Content Playlists and Scheduling
Ever feel like the right message matters just as much as the right timing?
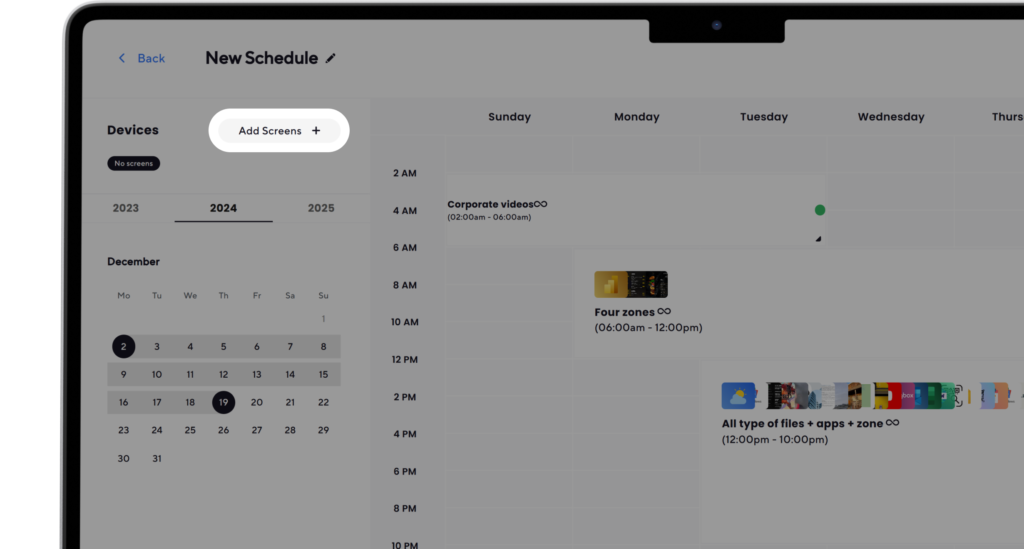
Set up content playlists and scheduling to make sure your screens always show the most relevant message. With content playlist scheduling, you can organize videos, images, menus, or announcements into playlists and assign them to specific times of the day.
This makes daypart signage easy, morning menus, lunchtime promotions, evening offers, or special holiday messages can all run automatically.
Using time-based content, businesses can also tailor messaging by day, time slot, or audience flow, ensuring screens stay fresh without constant manual updates.
To do this, open your AIScreen dashboard and go to the Schedule tab. Click New Event, select the screen or group of screens, choose a playlist, then define the start date, end date, and time window (for example, 8:00 AM–11:30 AM). You can also set recurring schedules for daily or weekly rotations.
Step 8: Launch Your Display
Ever get that moment of anticipation right before everything goes live?
Launch your display by previewing the scheduled content to confirm visuals, timing, and transitions are working correctly. Testing before launch helps catch layout or playback issues early and ensures a smooth rollout.
Once everything looks right, click Launch in the AIScreen dashboard to activate the schedule.
“You’re live! Your signage should now update automatically based on your CMS settings.”
From this point on, your Google digital signage system runs on autopilot, updating content in real time according to your schedules, without manual intervention.
Start Your 14 Days Free Trial with AIScreen’s Google Digital Signage Software
Ever wanted to test a powerful Google TV signage CMS without the risk or complexity? Starting your free signage trial with AIScreen is the easiest way to experience cloud-based content management, real-time updates, and seamless Google integration—without any upfront cost. Built as a top Chromecast digital display software, AIScreen lets you connect Google TV and Chromecast devices quickly, manage content from anywhere, and scale screens effortlessly across locations.
Getting started takes minutes, not days. AIScreen is designed for non-technical users, with fast setup, Google TV integration, and live support whenever you need it. You can create templates, schedule content, and launch displays from a browser or mobile device, no coding required. According to Intel, businesses using real-time digital signage updates can improve customer satisfaction by up to 46%, and AIScreen gives you full control to test those results firsthand during your free trial.


FAQs
What Devices Are Compatible with Google Digital Signage Software?
Google digital signage software is compatible with Android TV, Google TV, Chromecast, media players, search, and any screen that supports HDMI input. Devices like Toshiba Fire TV or Insignia Smart TVs are fully supported and commonly used for digital signage in commercial environments, including Google TV. These displays can easily connect to CMS platforms like AIScreen for seamless content delivery and remote control.
Can Google Digital Signage Software Be Used for Multiple Screens?
Yes, Google digital signage software can be used to manage multiple screens across different locations or zones. Platforms like AIScreen allow centralized control where users can assign content, schedule timelines, and monitor device status all from one dashboard to ensure you can continue to manage effectively. This multi-screen support makes it ideal for franchises, retail chains, or large venues that need consistent branding.
Does Google Digital Signage Software Support Remote Management?
Yes, Google digital signage software supports remote management through cloud-based CMS tools like AIScreen. You can access your dashboard via browser or mobile app to access the admin console, search and change content, update schedules, ensure a stable wifi connection, or check display status from anywhere. This flexibility ensures your content stays relevant without needing to visit the physical location.
Can I Set Up Google Digital Signage Software for Retail Environments?
Yes, Google digital signage software is highly effective for retail environments, helping businesses boost customer engagement and increase impulse purchases. Using tools like Google Slides and AIScreen, retailers can display menus, promotions, reviews, or inventory updates in real time. Research shows digital signage can increase foot traffic by up to 32%, especially when integrated with time-based offers.
How Do I Troubleshoot Issues with Google Digital Signage Software?
To troubleshoot Google Digital Signage software, start by checking your Wi-Fi connection and power supply, then restart the app and configure your settings to ensure your Google account is properly linked. Also, verify the device is correctly paired within your CMS dashboard. When problems persist, consult the CMS provider’s help center or reach out to technical support or a developer for guided assistance.
